Simon Jones explains how to create effective slideshows in Microsoft’s market-leading tool – and keep your audience from boredom or nausea
When you’re designing a presentation, it’s tempting to make it as whizzy as possible. After all, PowerPoint offers plenty of fancy features, so shouldn’t you try to use them?
Actually, no – just because you can perform eye-catching tricks doesn’t mean you should. PowerPoint is a great presentation tool, but it’s too easy to go overboard by adding stuff that distracts from the message you’re trying to convey. The general principle when working with PowerPoint is definitely “less is more”.
Let’s take an example. The act of moving from one slide to another is called a transition, and PowerPoint lets you choose from many different effects. Some of them are subtle, but many are so garish that you risk frightening your audience right out of the door. Preview them all, then pick the one that best matches the message you want to convey, your company’s image and the audience that will see the presentation.
Transitions
The Transitions gallery is divided into categories called Subtle, Exciting and Dynamic Content, but you should take these labels with a pinch of salt: some of the “subtle” transitions are anything but, while some of the “exciting” ones are rather dull.
Try to avoid the more slapstick transitions, such as Wind, Airplane, Crush or Origami, which treat your slides as though they’re pieces of cloth, curtains or sheets of paper. The Honeycomb, Glitter and Vortex effects, on the other hand, might look at home on a downmarket TV game show, but not in a business presentation. Simple fades or wipes are understated, less noticeable and let your message stand out.
The transitions in the Dynamic Content category animate only the foreground objects of a slide, leaving the background static. Using these will make your presentation look more professional, since they’ll cover up any black gaps between slides and ensure that – unlike the Push, Cover and Uncover effects – any gradient fills or background pictures remain in the same place from slide to slide.
Check your options
Most transition effects have options, mainly to do with the direction of travel (from the left, from the bottom and so on). You can also change the time taken to effect the transition. Generally speaking, you’ll want transitions to take between half a second and two seconds; each effect has a preset duration that you can change.
You’ll see a preview of each effect when you pick it, but you may need to view it in the context of the whole slideshow to be sure it’s right for you. You can pick one transition effect to cover the whole show by setting it on one slide and clicking Transitions | Timing | Apply To All, or by pressing Alt+K, L.
Alternatively, you can switch to the Slide Sorter view, select all the slides and apply the transition.
If you have intermediate slides that are intended to introduce new sections in your presentation, you may want to use a different transition to indicate that a change of section is underway. You can do this by selecting only those section-heading slides in the Slide Sorter view and applying the alternative transition to them. (Remember: a transition is the effect that takes you into a slide, not out of it.)
The perils of animation
I’ve watched far too many presentations in my time that include an animation such as a spinning coin on a slide that’s supposed to illustrate corporate revenue.
If you were to ask the audience afterwards what the company in question’s current revenue figure was – or even whether it went up or down in the last reporting period – a large proportion of them wouldn’t be able to tell you.
They’d only have seen the spinning coin, which would have completely distracted them from the rest of the slide’s contents, as well as from the speaker’s voice (it’s no coincidence that hypnotists use similar devices).
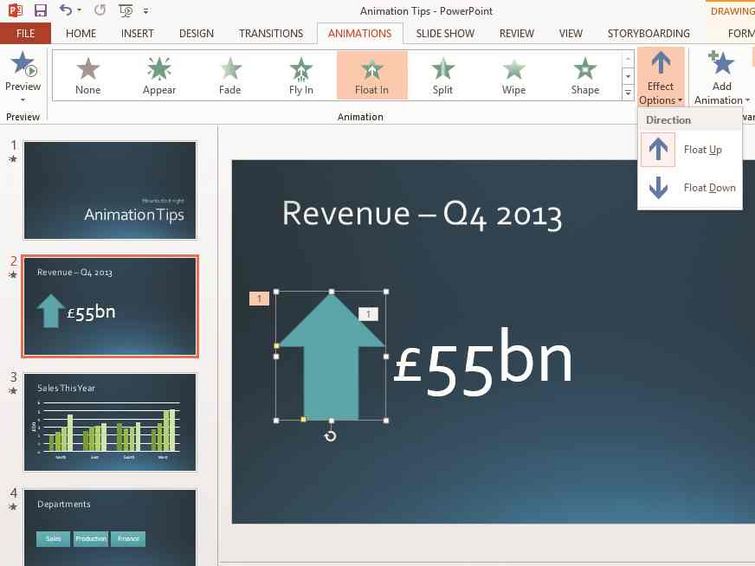
Animation is usually only effective in a presentation if it’s used subtly to emphasise the data you’re trying to convey.In the above example of corporate revenue reporting, you might want the headline figure in thousands, millions or billions – depending on the size of your company – together with an arrow that points up or down.
Apart from the title, these should be the only elements on the slide, and the animation must support the information you’re trying to impart.
Float In is a good effect for the upward arrow, followed by Fade In for the revenue figure.
This animation will support the message you want to convey (“revenue went up this quarter to £500,000”), and you should speak in sync with the slide being drawn. If you want preamble before you reveal the actual figure, you may want to make the arrow appear after a mouse click, but if there’s no preamble required, make it appear “after previous” (the previous animation being the new slide being drawn).

Always think about the words you’re going to say to accompany each slide, but don’t write them all down on the slide itself. The slide is there to illustrate your presentation; it isn’t the whole presentation. If you write down every word you’re going to say, there’s no point you being there to read them out: the audience will have read them before you’ve said anything – you’ll be adding nothing, and they’ll become bored very quickly. It’s better to make speakers notes that you can refer to while presenting.
The right effect
Animation effects are easy to achieve using the Animation Pane and the Animations tab on the ribbon. Animations are divided into four groups: Entrance, Exit, Emphasis and Motion Path. Entrance animations, which affect the way an item gets onto the screen, are the most commonly used. Emphasis animations can be used to highlight a particular object on the screen, but they should be used sparingly.
Exit animations should be used more rarely still: unless you’re actually talking about removing, deleting or otherwise making something disappear, you don’t need them. It’s usually sufficient to change to the next slide without having all the objects on the current slide fly away, split, fade or bounce off the screen.
Motion paths are perhaps the most abused of the animation effects, since making text or objects fly around the screen is best avoided unless you want to make your audience sick.
A good use of a motion path is when you have objects stacked on top of one another: using a motion path to move the top one out of the way to reveal what’s beneath, or to move the bottom object so it slides out from under the topmost object, can emphasise a process – such as a department being split into two – since the motion reinforces the concept that something new is emerging from something existing.
In PowerPoint 2013, the Animation gallery on the ribbon shows the most common animations in the four groups. However, many more are available from a dialog activated by the “More […] Effects” option at the bottom of the gallery. Several options, which are chosen via the Effects Options button, can be applied to each effect. The Float In effect, for example, includes options to Float Up and Float Down, while the Fly In effect can be set to start from any of the sides or corners of the screen.
Earlier versions of PowerPoint have a more complex Animation gallery, in which all the options are listed separately. The simplification of the Animation gallery for PowerPoint 2013 could be interpreted as an attempt by Microsoft to restrain the overuse of animation effects, but it still includes the most nauseating effects, such as Swivel and Bounce, on the main gallery. These should be banned from all business presentations under pain of a huge fine.
How to do it
To add an animation to an object, click the object to select it, then click to select the effect and option you want from the gallery. If you want more than one animation effect on a single object, click the Add Animation button to add a second or third animation to the object.

The Timing group on the Animations tab of the ribbon lets you decide whether the animation will be started by a mouse click, with the previous animation (that is, they’ll run concurrently), or after the previous animation. It also lets you set the duration of each animation, and the length of any delay before the animation starts. You can also reorder the animations by moving the current one earlier or later in the sequence.
However, these settings are actually easier to control via the Animation Pane (Animations | Advanced Animation | Animation Pane, or Alt+A, C). This shows all the animations on a slide, in the order they’ll play, complete with bars showing how long each effect will last.
You can drag the animation effects up and down this list to reorder them, and drag the start and end points of their bars left and right to change the duration and delay of each one; right-click an effect in the list (or click the down arrow at the right of the row) to change more options, such as the start trigger of the effect. The Animation Pane is great for making adjustments to effects you’ve already applied to a slide, but the Animations tab on the ribbon is the way to add more Animations.
If you want to animate a bar or chart to reveal its values gradually, there are additional options you need to play with. Under Effect Options, you can choose the way the chart animates – as a single object, by series, by category, by element in series or by element in category. If, say, you have a chart of sales by region and quarter, you could make the quarter the series and the region the category, or vice versa – it all depends on how you want to present the data. In any case, the category is what appears along the axis; the series labels appear in the legend.
Data focus
Remember, it’s the data that’s important, not the axes, grid lines and so on. As such, it’s better to have these elements appear with the slide itself and animate the bars afterwards. Do this by expanding the effect in the Animation Pane and deleting the effect from the background element of the chart (which should be first in the list). If you want a pause before revealing a particular bar or set of bars, set the animation for that series or category to start “On Click” rather than “After Previous”.
You’ll need to make sure every element of the chart is legible, even from the back of the room. The font size of the axis labels, legends and other paraphernalia must be large enough to be read easily. Show numbers in thousands, millions or billions as appropriate, with as few decimal places as possible – don’t leave people frantically trying to count zeros to work out how big a number is.
Motion Path animation moves an object around the screen, and appears when you are designing your slide as a dotted line between green and red arrows: the object will start its journey at the green arrow and end it at the red one.
When you’re editing this kind of animation, the object you’re moving is shown semi-transparently at both ends of the path, so you can see what it will be covering or covered by; this helps you line it up properly. This effect must be used carefully, however, since it’s all too easy to make viewers feel queasy by bouncing around objects for no good reason.
Quick presentation rules
• Keep it simple
•Keep the message and its audience in your mind at all times
•Don’t put all the words you want to say on your slides – otherwise, there’s no point in you speaking
• Keep the background simple and consistent
• Don’t put your company logo on every slide – not only is it distracting, but it’s also a waste of space
• Don’t clutter your slides – white space is important, too
• Each slide should concern only one topic to aid the audience’s concentration
• Use only one or two fonts, preferably sans serif ones, since they’re easier to read at large sizes
• Don’t use ALL CAPITALS or underline in the main text – these attributes reduce rather than enhance readability
• Use colour, bold and italics to emphasise important data
• Use SmartArt, diagrams and charts wherever possible to relieve the tedium of endless bullet points
• Use good-quality photographs liberally to illustrate your message
• Don’t be afraid to crop, rotate, flip and recolour photographs as necessary
• Avoid clip-art – it makes a presentation look lightweight and childish
• Make sure everything is big enough to be read from the back of the room
• Stick to one simple transition effect between your slides – with the exception of an alternative effect to mark new sections
• Use animation sparingly, and only to support or emphasise the message
• Don’t use sound effects
• Rehearse what you’re going to say before you present, and write speaker notes to remind you
• Make eye contact with the audience – don’t talk to the wall or the floor